You can use this pattern for teaching beginners or transforming your own knitted swatches into cute pettable bunnies.
Make a bunny from a knitted swatch — it's almost as clever as pulling a rabbit out of a hat! Downloadable pattern valued at $5.00.
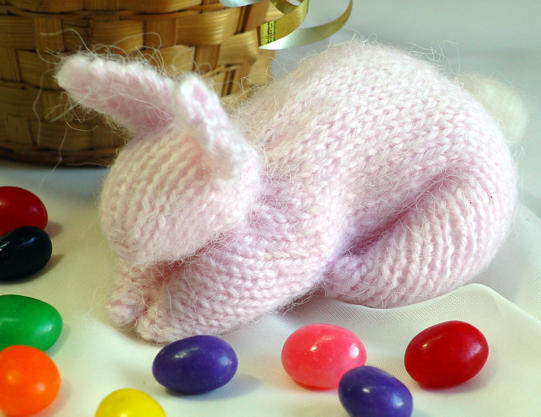
This bunny starts as a square piece of knitting. A few folds, stitching and stuffing transform the square into the bunny body. Add ears and tail for your own pettable bunny or a sure-to-be-appreciated gift.
In appreciation of your visiting HeartStrings, I offer the Knitted Bunny pattern to you as an instant pdf download. If you wish to donate to support this site and the continued development of new HeartStrings patterns and online resources, I would appreciate any amount you feel the pattern is worth to you.
A donation is appreciated, but not required.
Your thank you donation, small or large, is valued. Money will be used to continue to provide free educational resources.
Every donation counts. Thank you!
I hope you will send Pailo, Paula and Yvonne some love and let them know if you enjoy their translated patterns.
A BIG thank you to Diana Sullivan for putting together a video for the Knitted Bunny. Her demonstration is for machine knitting and using a sewing machine for sewing the legs. But even for hand knitters, this video can help you give you tips on getting your bunny hoppin' quickly.

Knit bunnies for this literacy program that promotes the importance of reading to children while they are very young. You might even be inspired to do something similar in your local area.
Peff M wrote:
I also knit for charity and intend to use your bunny pattern to make some huggable toys for children in trauma to use. Did you know that fire departments carry teddybears and blankets for children who are evacuated from burning houses? Sometimes these children leave without taking anything, so I make several at a time and donate them to the local fire and police departments.
I recently made a couple of these CUTE bunnies for a friend's baby shower - she had a bunny theme! I decided I wanted to make a more "secure" tail for the bunnies since this would likely end up in a child's nursery. Here's my simple version of the tail...
Using the same brand of yarn, but WHITE, knit an i-cord about 4-4.5 inches long. Finish off, tuck in ends. Make a flat spiral with the i-cord. Using a sewing needle and white thread, sew in lose end and drawn needle through to the other side of the spiral to make sure it won't come un-done. "Shape" the spiral into a good looking tail and sew to bunny's bottom securely.
Just another idea- thought I would share! I've already been asked by a few folks who attended the shower for the cute pattern and have gladly sent to the website!
Dear Jackie,
I teach knitting here in East Tennessee. I send my beginning students to your site to print off the free bunny pattern. As first timers they love to look at the site and the future things they will be able to make. It is also energizing to take the first swatch they do in stockinette stitch and make something out of it. It appeals to children/grandchildren of all ages. Thank you, thank you for making it available.
Some of my students had trouble making the ears stand up and resorted to calling their bunny a lop eared bunny. I made the following change to the ear pattern and the ears seem to stand up better.
Cast on 5 stitches.
1) K.
2) K2, p, k2.
3) Repeat rows 1 and 2, 5 times.
4) Decrease a stitch every other row maintaining pattern until 2 stitches remain.
5) K.
6) K2tog.
I would be honored if you would consider adding these ears to your pattern. I am enclosing a scanned picture of the ears which I had to flatten to scan. But if you try the pattern I'm certain you will see the more upright effect.
Thank you again. Barbara White
Last revised