To Seam or Not to Seam?
Finishing starts at the beginning: Consider the trade-offs in seaming
by Jackie E-S
Make the finishing steps of your knitting project easier and seem effortless by making good choices at the very beginning of your project.
It might seem contradictory to the meaning of "finishing", that I should discuss finishing as something that starts at the beginning. But I firmly believe that by thinking about your finishing right from the beginning of the project, you can eliminate and ease a lot of the finishing hassles later on.
Sewing pieces together is something that seems to take me a lot of time to do. The actual time to do the sewing is small compared to the mental vamp-up time to tackle the job. I'd just rather be knitting than sewing! Because of this, an important part of my up-front planning includes –
- looking ahead at what pieces will need to be seamed
- considering trade-offs in eliminating extra seams
- planning the edge stitches to use on pieces to be seamed in order to make those seams easy to sew later on and look professional
What pieces will need to be seamed?
We will use a sweater as an example. In sewing patterns where pieces are cut from 2-dimensional woven or knitted goods with limited width, typically the pieces to be assembled are the front and back seams, sleeves, collar and other bands or edgings. In hand knitting, we have the additional flexibility that the pieces can be constructed in 3-dimesions and made to any width that your knitting needles can accommodate.
Things to look for in choosing patterns with fewer seams include things like –
- pullovers where the body is worked circularly, or cardigans where the body is knit in one piece and thus eliminates the side seams
- sleeves are worked circularly
- edgings and bands are begun by picking up and knitting, or worked as you go
I am not advocating that a knitting pattern must have all these characteristics. They are just what I look for in patterns, or when designing my own. Chances are if two patterns are similar, and one has fewer seams to sew, all other things being equal, I will go with the fewer seams.
Here are a couple of the HeartStrings sweater patterns to illustrate design techniques in no-sew seamless construction.
Consider trade-offs in eliminating seams
Although it may sound like the ideal goal would be to eliminate all seams to be sewn, doing so may not be the best choice in light of other considerations. Some things to think about:
- Making separate pieces for front and back can allow you to make one piece first (people usually prefer to start with the back), and verify measurements before proceeding with the front(s). A certain amount of "fudge" can sometimes be adjusted into the front or back if needed.
- Working the entire body circularly or in one piece requires longer needles, usually circular ones or multiple double point needles. Likewise, working sleeves circularly requires smaller circular needles or double points. This may mean you need to buy more needles, but you may not want to or may not have ready access to the ones needed. Also, if you prefer working with smaller pieces on straight needles, by all means enjoy your knitting!
- If the pattern stitch is only given for flat knitting, you may need to convert it to circular knitting. This certainly is not impossible, and most times is not even difficult. But it is a consideration. We won't go into how to do this - that could be another whole series of articles! However, I did hear there is a Yahoo Groups called Circular Knitting (email circularknitting-subscribe@yahoogroups.com to subscribe) that will be exploring conversion of flat knitting patterns to circular.
- Design consideration and preferences may play a part in your choices. Here is an example of a sweater pattern where I chose to knit the sleeves separately (although circularly so there is no underarm seam) and sew into the arm holes. This was a design trade-off, as I wanted to start the sleeves at the bottom to retain the same wavy pattern along the edge as the body. The remainder of the pattern requires no sewing of seams.
Waves and Flowers Shell
Pay attention to your edge stitches
For pieces that will be joined, either by sewing or knitting together, make it as easy for yourself later on by considering your edge stitches compared to the seaming technique you will use. I assume that you will want your seams to look professional, so planning now will get you a long ways toward that goal. The following discussion is primarily focused on sewn joins. There are also knitted joins that I sometimes specify in my patterns, but I will not get into details on that at this time.
Unless I am planning for the seam itself to be a design element, my goal is low-bulk, invisible seams. Low-bulk means that there is minimal amount of extra yarn inside the seam. Invisible means that the seam line is not a distraction e.g. pattern stitch repeat or motif is uninterrupted if appropriate across the seam line, and there is no distortion. Here are some things to consider:
Should you knit your edge stitches every row, or use a slipped stitch selvedge (i.e. edge stitches are slipped every other row)?
I find that using edge stitches worked every row to be the most flexible e.g. easing together seams that are not strictly the same lengths (e.g. easing in a set-in sleeve), and for pick-up ratios where the number of stitches to be picked is more than every other row. For achieving low-bulk seams where I knit my edge stitch every row, I take in half a stitch on each side of the seam. Since half of each edge stitch remains on the public side, be sure to keep these stitches in pattern so that together they represent one whole stitch of the pattern motif.
Seaming Stockinette Stitch for Low Bulk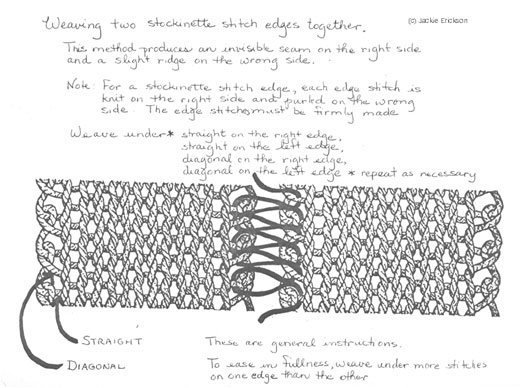
If I have worked a slipped stitch selvedge, I take in a whole stitch on each side when sewing the seam. Remember that the slipped stitches at the edge are in addition to actual pattern stitch motifs.
An illustrative example is the Lace and Ribs Sweater. In this pattern, the side and underarm sleeve seam edges have a slipped stitch selvedge. The edges to be seamed have basically the same number of rows, and easily match up stitch for stitch across the complex pattern to produce an invisible seam. On the other hand, the edge stitches of the sleeve armholes and sleeve caps are knit every row. When sewing in the set-in sleeves, the seam uses half-stitch from each edge. When easing in the sleeve cap, there are additional edge stitches in which to sew (rather than if a slipped stitch selvedge were used in this area).
What about decreases and increases at the edges? I usually suggest keeping the edge stitches in plain knit/purl as in keeping with the pattern stitch, or slipped stitch selvedge as appropriate. Therefore, make any decreases or increases one or two stitches away from the edge.
Remember that edge stitches should be uniform and not sloppy. Even if you think that sloppy stitches will just be hidden on the wrong side, they really do make a difference in the appearance of the seam on the public side. So use whatever method works best for you in giving you the most uniform stitches possible.
What's next
I hope this article offered you something new, or reminded you of something old to use in a new way to help make the finishing steps of your knitting projects easier and seem effortless. For more tips, see the next article in the Finishing Starts at the Beginning series — End-less Knitting.
Return to Index of Jackie E-S Articles & Tips.
|